
Separating points of favor, there are points on this life that are previous attain: I’ll in no way private a superyacht, say, or a gaggle of cashmere Loro Piana sweaters, fastidiously folded and laid side-by-side in a cavernous mahogany walk-in with alcove lighting. Nevertheless there are only a few luxuries we little people can afford, if we really want them: Good ice cubes, modern flowers spherical the house, and, on the upper limits of unadulterated opulence
The events I’ve showered en plein air, whether or not or not at journey leases or associates’ properties, have been surprisingly liberating, à la the skinny dip; when your bathing experiences for the earlier 20 years have been in cave-like settings that no amount of eucalyptus boughs or candles can therapy, sudsing up open air is an epiphany. With out exaggeration, for individuals who’ve in no way bathed uncovered to the climate, a bit photo voltaic, possibly a breeze, and a rainfall showerhead is la dolce vita, people.

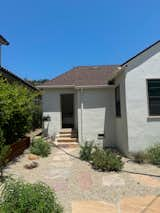
Early this summer season season my partner and I moved proper right into a small standalone in Central California with two beds, one tub, and one different artificially lit bathe. In some unspecified time in the future I appeared out our mattress room’s glass-paned door that opens into the sun-dappled yard and decided a model new future for ourselves—we could very nicely be plenty of the lucky ones.
You might in no way have the power to spend recklessly on lids of caviar for the homies, or private an Italian villa the place you’re free to expend an inheritance making harmful work, nevertheless I’m proper right here to tell you that luxurious, nonetheless it’s essential to define it, is inside attain. In case you may have a yard with in any case a bit privateness, with only a few days’ work and $1,000—a lot much less, if you would like—you, too, can arrange an outside bathe that will pay lifestyle dividends that far exceed your tax bracket.
Discovering the Spot
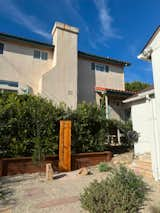
In planning the place to put the bathe, I was pacing spherical our yard, stopping, attempting up on the photo voltaic, scoping sight strains to neighbors. I’d moreover merely sit and stare out our consuming room dwelling home windows, attempting to visualise the place a bathe might decide into our yard. I might want to have appeared like a mad particular person. In the long run, placement bought right here down to three elements: privateness, good delicate, and entry to a water hookup. Probably the greatest spot ended up being in the direction of a hedgerow close to our mattress room, the place there was a spigot, and our neighbors’ sight strains might be blocked.
Designing the Bathe
You probably can assemble an outside bathe fast, for those who want to. The reality is, you don’t should assemble one thing. Place this concrete-based selection, be part of a hose, and get to bathing. You probably can pound this one into the underside with a mallet in a matter of minutes.
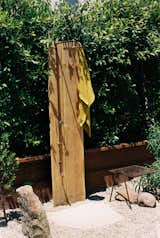
I needed to dream larger than that. And I actually like custom-made points. So I started by perusing examples on Pinterest and, in spite of everything, this site, to resolve what I favored. My first instinct was to go minimalist and restore a copper bathe tools to a 4×4 publish so that it’d “disappear” into the hedges behind it. Nevertheless doing which may have missed a chance to make this additional of a design second in our yard. Being a fan of Molly Sedlacek’s designs at her panorama design and outdoor product studio ORCA, this outdoor bathe caught my eye.
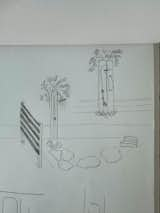
Iterating on sketches in my pocket guide helped me “see” the finished bathe—figuring out its proportions, the place to place it, reaching steadiness between the copper pipe, its backstop, and the 10-inch showerhead I ended up purchasing for off of Etsy. (Proper right here’s my complete outdoor bathe assortment, for individuals who’re attempting to duplicate this aesthetic.)
Elements of the thought bought right here collectively on the ironmongery store floor. At my native Ace, I laid out planks of wood on the underside—for hours, ideas you, on account of choosing grain is an paintings—to look at the bathe’s backstop, toying with pairing completely totally different widths and lengths. The powerful reduce redwood 2x10s I first launched dwelling ended up not being pretty correct, so I heaved the eight-foot planks once more onto my automotive’s roof racks and swapped them for Douglas fir, a 2×8 and 2×12, with additional of a “polished” look off the rack. The thought was to attach the bathe fixture to the smaller plank so it’d actually really feel balanced with the bigger, naked one. The bigger one, too, would physique a zone to step out from under the bathe head. (I might need used cedar for its sturdiness open air, nevertheless couldn’t uncover wide-enough objects domestically).
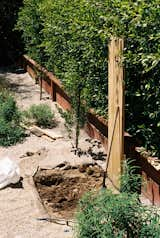
Setting up the Backstop
To create the bathe’s backstop, I positioned the two planks on the underside, leaving a small gap, and screwed in low price stakes to hold them collectively. (Remember that for individuals who do a distinct segment between the planks, as I did, it may possibly grow to be additional pronounced as a result of the wood dries out.) I then set the planks aside in the intervening time to rearrange the realm the place I’d put them throughout the ground.
With the bathe area plotted out throughout the yard, I started clearing gravel, and made cuts throughout the {{hardware}} cloth and landscaping material beneath, peeling them out of the way in which through which. The planks for the backstop have been eight ft, and I needed to bury one foot of that throughout the ground. That meant digging a foot and half all the way in which right down to fill half a foot with three-quarter-inch gravel, which could allow any water to empty away from the ends of the wood to forestall rotting. A tip from me: Make the opening as huge as you suppose it’s advisable so that everytime you add the cement, it may possibly help the planks. (Sorry that’s no extra scientific.) You can also wrap the ends of your wood in plastic, as I did, which, in precept, will help cease rot. (Merely deliberate to go away the underside open so water can depart the wood.)

Subsequent was plumbing the backstop—making it fully straight. After pouring a bit gravel into the pit, I positioned the backstop to get a means of the way in which it ought to face. Then I screwed 4 stakes into the edges and once more so it’d preserve upright by itself, making refined modifications to each until the backstop was fully upright. To confirm my work was sound, I taped ranges to the doorway and aspect, nevertheless there’s most certainly a larger gadget for this.
With the planks positioned, I poured quickcrete into the pit spherical them and added water per the instructions.
(Remember: To ensure that you your wood backstop to last a really very long time, it is a good suggestion to let the wood dry out for a few month after which seal it. I was impatient and easily constructed my backstop and put it throughout the ground, after which sealed it a couple of months later using Precise Milk Paint Co.’s Exterior Safety. It has good opinions, and is unhazardous, which I am a sucker for.)
Making the Drainage Pit
With the backstop in place and stakes eradicated, I started digging the drainage pit. That’s the half the place I noticed how heavy grime is, notably when it’s damp clay, as it is the place I keep. I dug a four-by-four-foot pit two-feet deep, with a slight slope that adopted that of the yard’s so the water would drain in that path, away from the house. I stuffed particles baggage as I went and when accomplished, was tempted to dump the some-1,000 kilos of grime mob-style on the end of a darkish avenue someplace. Nevertheless just like the swish operator that I am, I hauled them to the native waste administration center and, for a small worth, let any particular person else do the dirty work.
With the pit dug, I lined it with landscaping material and left the perimeters prolonged in order that when the gravel was poured in, I could wrap it like a bundle. This half is important! In case you occur to don’t defend the gravel from the surrounding grime, sediment will fill out the nooks and the pit obtained’t take water or drain appropriately.
The next step was satisfying: I stuffed the pit with baggage of three-quarter-inch gravel, packed it down with a tamper gadget, then pulled the prolonged edges of the landscaping material all through the very best and tacked it down with gardening stakes.
Choosing Flagstone for the Floor
In case you occur to’ve in no way been to a rock yard, go now, even for individuals who don’t have any trigger to. It is inspiring to be throughout the presence of that quite a bit weight. I was so impressed, really, that I chosen a slab that was lastly too huge—a lesson I noticed the onerous methodology. A pleasing man on the yard forklifted the rock into my truck, and after I acquired dwelling, I didn’t have an answer to put it alone. (We’re talking 150 kilos of awkwardly distributed weight). And, it was too huge to function appropriately anyway! It might need coated loads of the drainage pit I labored onerous digging.

What if I pushed it out of the once more of my truck? I assumed. It’d fracture in a cool methodology. I pushed and purchased a pile of jagged slivers. Dismayed, I set these aside and went once more to the stone yard. This time, I grabbed the proper piece: a slab of Arizona peach that wasn’t so heavy I couldn’t heave it alone, in a measurement and type that allowed for water to run off the perimeters into the drainage pit. Once more at dwelling, I positioned it under the place I envisioned the water falling relative to the backstop after which swept the ground-cover gravel once more into place spherical it. Now I had a buttoned-up yard with a backstop that was ready for a bathe fixture.
Setting up the Bathe Fixture
First a phrase about going custom-made: There was some YouTubing that wanted to happen to confirm setting up a copper fixture was inside my wheelhouse. This video was my crash course in soldering, which is as easy as a result of it seems. I did this on the tailgate of my truck, with the weather I was blasting with heat hanging off the aspect. In case you occur to don’t have to solder, you’ll bypass it altogether with these push-to-fit pipe connectors, nevertheless your bathe will look knobby, not slick. Chopping custom-made lengths of pipe, like I did, would require each a pipe cutter or seen. (Or probably anyone good on the ironmongery store will do it for you.)
In case you’re going custom-made, resolve ahead of time whether or not or not you may trench to attach along with your non-public dwelling’s plumbing for first rate water, or run a hose to your bathe. I chosen the latter, cheaper selection, partly on account of I could get away with hiding a hose behind a quick retaining wall buttressing the hedges the place I was putting the bathe, and tap-temperature water is good for warmth Central California summers. (I’d later resolve in order so as to add a tankless water heater for year-round use—additional on that underneath.)
Similar to how I decided on the wood for the backstop, I laid out copper objects and fixtures on the bottom to resolve the way in which it should look and efficiency. I needed a spigot on the bottom to wash ft or fill a canine bowl, a single valve for on/off, a tee joint to run behind the backstop to connect the hose to, and, in spite of everything, the showerhead. The entire objects are there for you throughout the plumbing a part of your native ironmongery store to actually really feel this out.
Half-inch copper pipe felt like the proper measurement to me aesthetically. After about two months of use, I’m nonetheless happy with the showerhead I purchased, nevertheless, we have onerous water, so perforations get clogged with limescale, requiring a vinegar-and-hot-water soak now and again to hold it once more to full working order. (One factor like this brass showerhead from ORCA could not have that downside.) This ball-joint adaptor lets me place the bathe head and take away it as needed. For any components that screw collectively—the bathe head; the valve; the spigot; the hose—be sure to use plumbers tape throughout the threads for a leak-free seal.
Sooner than hanging the fixture, I drilled a three-quarter-inch hole throughout the backstop for the pipe connecting to the hose to run by. After that, I hung it on the backstop. I used primarily essentially the most main copper hangers I could uncover, though there are nicer decisions. I constructed my fixture so that the horizontal arm for the showerhead would come flush with the very best of the backstop, which stands at seven ft, and the showerhead would grasp extreme adequate for my partner or I to utilize comfortably, which ended up being about six ft, six inches.
From proper right here, we screwed throughout the hose, turned on the valve, and voila! An outside rainfall bathe. Miraculously, my first go at soldering pipe held up, with no leaks. (Later, when unscrewing the showerhead to control one factor, I dropped it, cracking a seam. The solder I utilized has held up to this point.)
Hooking Up the Tankless Water Heater
As quickly because the local weather started to sit back off and we realized we nonetheless wished to utilize the bathe comfortably, we added a tankless water heater. In reality, with the entire work I put in enthusiastic in regards to the bathe’s aesthetics, I needed one factor that appeared good. Nevertheless it absolutely lastly didn’t matter since I’d be hanging it out of sight. In my evaluation—combing by Reddit threads and finding out opinions on companies’ web sites—the most effective decisions have been heaters equipped for tenting. These are supposed to remain open air, significantly—you shouldn’t depart them out throughout the rain, or expose them to freezing local weather—and hook as a lot as a propane tank.
In my restricted understanding, you need a unit that matches or exceeds the flow into popping out of your spigot, in some other case it obtained’t heat the water very correctly. In case you occur to don’t know what your flow into payment is, there are easy-to-install devices you can purchase to check it. Gasland despatched over a unit to verify—a 16-liter tankless heater that will take care of 4.22 gallons per minute. I favored that Gasland’s heater had a temperature-control knob with an accompanying digital present, so that you acknowledge exactly how scorching the water coming out is. It moreover has a flow into knob, which provides you further administration over temperature—at a lower flow into payment, the water heats additional shortly, and can get hotter.
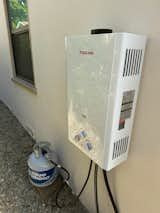
In case you’re helpful with a drill, placing within the unit is surprisingly easy. I put two screws with drywall anchors straight into our dwelling’s facade, and metal tabs on the excessive of the heater permit you to slide it over the screws. Taking it down is just as easy, which, for anyone that lives someplace with heavy local weather, makes it easy to stash the unit for the winter. The rest is pretty plug and play: screw in your hoses—buy thread adapters for individuals who need them; I did—and be part of a propane tank. So far, the heater is working like a dream. It heats water fast. Like, 100 ranges in 15 seconds fast. It heats water additional shortly than my kitchen sink or the indoor bathe, which are on a separate, electrical tankless water heater for my dwelling. Your propane heater’s effectivity will in spite of everything fluctuate relying in your native climate.
Ending Touches
I “adorned” the bathe with some huge rocks, which, along with some plantings, help physique the bathe throughout the yard. An outside metal desk my partner and I’ve had for years has impulsively found its true calling subsequent to the backstop as a spot to put a towel, cleansing cleaning soap, and totally different bathing requirements.
I bought a small metal cleansing cleaning soap holder to hook up with the backstop’s wider plank, nevertheless every time I keep it in place, it doesn’t actually really feel correct. I’ll maintain toying with that. I moreover just like the idea of a hook fixed to the backstop to carry a towel, nevertheless for now, draping it over the sting of the backstop retains it at hand nevertheless out of the way in which through which of water.
Now, with a newly put in outdoor bathe merely down a set of steps set in the direction of a hedgerow, our socioeconomic stratum is materially unchanged, nevertheless we actually really feel wealthy. In summer season season, a flip of the valve delivers a rush of ground-cooled, 60-some-degree Fahrenheit water that’s fully refreshing throughout the heat of our sun-soaked Central California yard. In each different season, the tankless heater delivers a steamy 104 ranges in a matter of seconds, turning our yard proper right into a spa-like en suite that, if I will say so, is nothing in want of pure luxurious.
We love the merchandise we attribute and hope you do, too. In case you occur to buy one factor by a hyperlink on the positioning, we’d earn an affiliate payment.
Related Learning: